
Fuji Xerox Error Code List. Troubleshooting
FujiFilm, Xerox Printer, Scanner Troubleshooting Power Supply Problems. Troubleshooting by Error Message, How to Check Error Message, Information / Warning/Error.
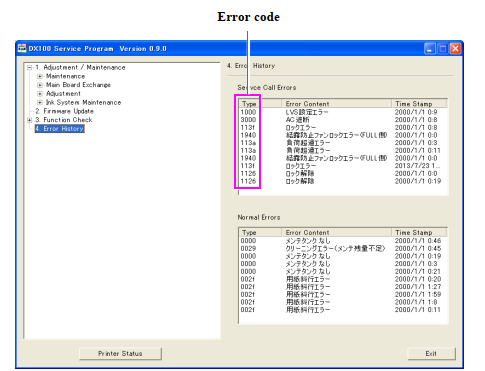
When an error occurs, the following error screen will be displayed the Error History on the Service Program
How to Check Error Message
1. Start the Printer Driver.
2. Click [Property].
3. Click [Display Printer Status].
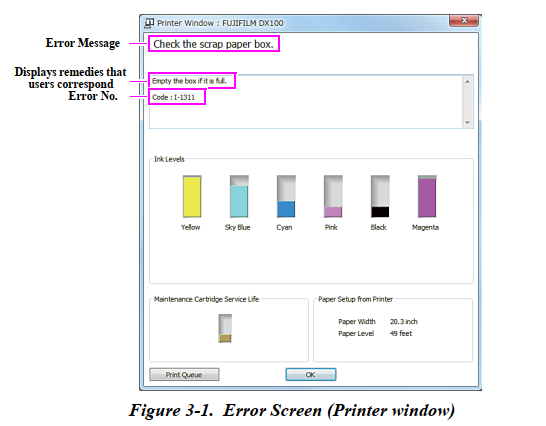
4. Printer window appears
|
Error ID |
Name |
Message |
Cause (Status) |
Remedy |
|
I-1311 |
Trimmed Waste Paper Box full |
Check the Trimmed Waste Paper Box. Empty the box if it is full. |
Trimmed Waste Paper Box Usage became full. |
Remove the scraps from the Trimmed Waste Paper Box. |
|
I-2101 |
Ink Tube life near end (Notice) |
It is nearly time to replace parts. • Ink Supply Tube Contact a technical representative. You cannot print if parts have reached the end of their service life. |
The replacement time of Ink Tube is near. |
1. Replace the Ink Tube with a new one. (P. 116, P. 186, P. 179) 2. Reset the counter of the Ink Tube. (P. 219) |
|
I-2102 |
Decompression Pump Unit life near end (Notice) |
It is nearly time to replace parts. • Ink Supply Decompression Pump Contact a technical representative. You cannot print if parts have reached the end of their service life. |
The replacement time of Decompression Pump Unit. |
1. Replace the Decompression Pump Unit. (P. 181) 2. Reset the counter of the I Decompression Pump Unit. (P. 219) |
|
I-2103 |
Passage Pump maintenance near end (caution) |
It is nearly time to replace parts. • Ink Supply Pump Contact a technical representative. You cannot print if parts have reached the end of their service life. |
The replacement time of Ink Passage Pump Unit. |
1. Replace the Ink Cartridge Holder. (P. 175, P. 179) 2. Reset the counter of the Ink Cartridge Holder. (P. 219) |
|
I-2104 |
Suction Pump maintenance near end (warning) |
It is nearly time to replace parts. • Ink Suction Pump Contact a technical representative. You cannot print if parts have reached the end of their service life. |
The replacement time of Ink Suction Pump Unit. |
1. Replace the Capping Unit. (P. 182) 2. Reset the counter of the Capping Unit. (P. 219) |
|
I-2201 |
Ink low |
Ink Low (X*) Prepare a new Ink Cartridge. You may continue printing until replacement of the Ink Cartridge is required. |
The replacement time of the corresponding color’ s Ink Cartridge is approaching. |
Check the remaining ink level on the “Printer Status” screen of the Service Program. (P. 217) |
|
I-2307 |
AID out of guaranteed temperature error |
Cannot perform [Detect Clogging] correctly. Room temperature may not be within the guaranteed operating range. Check the room temperature. |
The temperature of the room where the printer is installed is out of the guaranteed range. (P. 17) |
If the room temperature is within the guaranteed range, delete all the print jobs and perform Diagnostic Cleaning with the maintenance tool. |
|
I-2401 |
Maintenance Cartridge near end |
Replace the Maintenance Cartridge soon Prepare a new Maintenance Cartridge. You may continue printing until replacement of the Maintenance Cartridge is required. |
The replacement time of Maintenance Cartridge is approaching. |
Check the remaining maintenance Cartridge level on the “Printer Status” screen of the Service Program. (P. 217) |
|
I-5201 |
Job size limit warning (SDK) |
Amount of data in print jobs sent to printer nearly at maximum limit. Stop sending the current print job and send the remaining pages as another print job. |
The amount of data of the print jobs being sent to the printer has nearly reached the maximum limit. |
Delete all the print jobs once and send them in parts. |
|
Error ID |
Name |
Message |
Cause (Status) |
Remedy |
|
W-1101 |
Paper Jam (Roll unit) |
A paper jam has occurred. Delete all print jobs remaining in the operating system's print queue. Remove any paper remaining from the roll paper feeder, and then reload the paper. |
Paper jam occurred on the Roll Unit during printing. |
1. Remove paper inside of the Roll Unit. 2. Reset the roll paper on the Roll Unit. |
|
W-1102 |
Paper Jam (Rear Cover / Top Cover) |
A paper jam has occurred. Delete all print jobs remaining in the operating system's print queue. Open the Rear Cover and the Top Cover, remove any paper remaining, and then reload the paper. |
Paper jam occurred on the Rear Cover during printing. |
1. Open the Top Cover. 2. Open the Rear Cover. 3. Remove the jammed paper. 4. Reset the roll paper on the Printer. |
|
W-1103 |
Paper skew error |
An error has occurred in the paper feeding unit. Delete all print jobs remaining in the operating system's print queue. Reload the paper in the same way as when replacing paper. |
Paper is not fed straight. |
Remove paper and insert it again. |
|
W-1104 |
Paper setting error |
Paper is not loaded correctly. Delete all print jobs remaining in the operating system's print queue. Check the positions of the edge guides, and then reload the paper. |
Roll paper is not correctly installed. |
Reset the roll paper on the Roll Unit. |
|
W-1105 |
Paper end error |
Paper is out. Delete all print jobs remaining in the operating system's print queue. Load paper. |
No paper is installed. |
Install a new roll paper as Roll Unit. |
|
W-1106 |
Paper out |
Paper is out or not loaded correctly. Delete all print jobs remaining in the operating system's print queue. Load paper. |
No paper is installed as Roll Unit. |
Install a new roll paper as Roll Unit . |
|
W-1107 |
Paper mismatch error |
The loaded paper does not match the print settings. Delete all print jobs remaining in the operating system's print queue. After deleting the print jobs, change the print settings or the loaded paper, and then print. If you click [OK] without deleting the print jobs, the jobs are printed using the current settings. |
The paper setting and the paper installed do not correspond. |
• Set specified roll paper. • Set the paper type and the amount of the remaining paper with the printer window. |
|
W-1108 |
Paper size error |
The width of the loaded paper is not supported. Delete all print jobs remaining in the operating system's print queue. Load supported paper. |
The size of loaded paper is not supported. |
Set specified roll paper. |
|
W-1301 |
Trimmed Waste Paper Box not installed |
The scrap paper box has come off. Delete all print jobs remaining in the operating system's print queue. Install the scrap paper box correctly. |
Trimmed Waste Paper Box is not installed. |
Reset the Trimmed Waste Paper Box. |
|
W-1302 |
Right IC Holder Cover open |
Cartridge cover (right) open. Delete all print jobs remaining in the operating system's print queue. When replacing a cartridge, check the location and the cartridge type. Close the cartridge cover. |
• Right IC Holder Cover is open. • Right IC Holder Cover is damaged. |
1. Close the Right IC Holder Cover. 2. Replace the Right IC Holder Cover Open Sensor with a new one. (P. 168) |
|
W-1303 |
Left IC Holder Cover open |
Cartridge cover (left) open. Delete all print jobs remaining in the operating system's print queue. When replacing a cartridge, check the location and the cartridge type. Close the cartridge cover. |
• Left IC Holder Cover is open. • Left IC Holder Cover is damaged. |
1. Close the Left IC Holder Cover. 2. Replace the Left IC Holder Cover Open Sensor with a new one. (P. 168) |
|
W-1304 |
Top Cover open |
Top Cover open. Delete all print jobs remaining in the operating system's print queue. Close the Top Cover. |
• The Top Cover is open. • The Top Cover Open Sensor is broken. |
1. Close the Top Cover. 2. Replace the Top Cover Open Sensor with anew one. (P. 164) |
|
W-1305 |
Rear Cover open |
Rear Cover open. Delete all print jobs remaining in the operating system's print queue. Close the Rear Cover. |
• The Rear Cover is open. • The Rear Cover Open Sensor is broken. |
1. Close the Rear Cover. 2. Replace the Rear Cover Open Sensor with anew one. (P. 170) |
|
W-2201 |
Ink cartridge mismatch error |
Ink Cartridge error (X)* Delete all print jobs remaining in the operating system's print queue. Please install correct cartridge. |
The corresponding color’s Ink Cartridge is not recognized. |
1. Reset the corresponding color’s Ink Cartridge. 2. Replace the corresponding color’s Ink Cartridge with a new one. 3. Connect the FFC that connects the Ink Cartridge Holder and the Main Board again. 4. Replace the Ink Cartridge Holder with a new one. (P. 175, P. 179) |
|
W-2202 |
Ink end error |
Replace Cartridge (X)* Delete all print jobs remaining in the operating system's print queue. |
The ink of the corresponding color’s Ink Cartridge is close to running out. |
Replace the corresponding color’s Ink Cartridge with a new one. |
|
Error ID |
Name |
Message |
Cause (Status) |
Remedy |
|
W-2203 |
Ink Cartridge error |
Ink Cartridge error (X)* Delete all print jobs remaining in the operating system's print queue. Please install correct cartridge. |
The corresponding color’s Ink Cartridge is not recognized. |
1. Reset the corresponding color’s Ink Cartridge. 2. Replace the corresponding color’s Ink Cartridge with a new one. 3. Connect the FFC that connects the Ink Cartridge Holder and the Main Board again. 4. Replace the Ink Cartridge Holder with a new one. (P. 175, P. 179) |
|
W-2204 |
Ink Cartridge error |
|||
|
W-2205 |
Insufficient ink remaining amount error |
Insufficient ink left to perform initial charge. Delete all print jobs remaining in the operating system's print queue. Replace the Ink Cartridge. |
The Ink Cartridge does not have enough ink for initial ink charge in it. |
Replace the Ink Cartridge with a new one. |
|
W-2301 |
AID all nozzle clogging |
Cannot perform [Detect Clogging] correctly. Delete all print jobs remaining in the operating system's print queue. Perform [Diagnostic Cleaning]. Contact service support if the error continues to occur. |
• AID Unit is broken. • Main Board is broken. |
1. Check the connection between the AID Unit and the AID cap and also check its conduction. (P. 275) 2. Replace the AID Unit if the problem is not solved. (P. 113) |
|
W-2302 |
AID current leak error |
1. Perform the head cleaning. (P. 222) 2. Check if there is any foreign object in the AID cap. (P. 275) 3. Check if there is any foreign object attached on the Print Head. (P. 275) 4. Check the status of the mechanism conducting and insulating state AID Unit. (P. 275) 5. Replace the AID Unit if the problem is not solved. (P. 113) |
||
|
W-2303 |
Auto Ink Detection Board communication error (abnormal test pulse) |
No communication between the AID Board and the Main Board. |
1. Check the FFC connection between the AID Unit and the Main Board. (P. 275) 2. Replace the AID Unit if the problem is not solved. (P. 113) |
|
|
Error ID |
Name |
Message |
Cause (Status) |
Remedy |
|
W-2305 |
Auto Ink Detection Board communication error (Abnormal termination) |
Cannot perform [Detect Clogging] correctly. Delete all print jobs remaining in the operating system's print queue. Perform [Diagnostic Cleaning]. Contact service support if the error continues to occur. |
No communication between the AID Board and the Main Board. |
1. Check the FFC connection between the AID Unit and the Main Board. (P. 275) 2. Replace the AID Unit if the problem is not solved. (P. 113) |
|
W-2306 |
Noise error |
• Foreign material is in the AID cap. • Insulation of a AID Unit worse. • The AID Unit is damaged. |
1. Perform the head cleaning. (P. 222) 2. Check if there is any foreign object in the AID cap. (P. 275) 3. Check if there is any foreign object attached on the Print Head (Print Head surface). (P. 275) 4. Check the status of the mechanism conducting and insulating state AID Unit. (P. 275) 5. Replace the AID Unit if the problem is not solved. (P. 113) |
|
|
W-2311 |
AID nozzle clogging (when starting/finishing a print job) |
Clogged nozzle(s) detected. Delete all print jobs remaining in the operating system's print queue. Perform [Diagnostic Cleaning]. |
The clogged nozzle is detected when printing is started/finished. |
Make sure to print a nozzle check pattern and check for the condition of the Print Head to perform the head cleaning. (P. 222) |
|
W-2401 |
Maintenance Cartridge not installed error |
Maintenance Cartridge not installed Delete all print jobs remaining in the operating system's print queue. Install the Maintenance Cartridge. |
The Maintenance Cartridge is not recognized. |
1. Replace the Maintenance Cartridge with a new one. 2. Replace the Maintenance Cartridge Cover with a new one. (P. 103) |
|
W-2402 |
Maintenance Cartridge full error |
Maintenance Cartridge usage exceeded the application limit. Delete all print jobs remaining in the operating system's print queue. Replace the Maintenance Cartridge. |
The replacement time of Maintenance Cartridge is approaching. |
Replace the Maintenance Cartridge with a new one. |
|
W-2403 |
Maintenance Cartridge error |
Maintenance Cartridge cannot be recognized Delete all print jobs remaining in the operating system's print queue. Install the Maintenance Cartridge correctly. |
The Maintenance Cartridge is not recognized. |
1. Replace the Maintenance Cartridge with a new one. 2. Reconnect the FFC that connects the Maintenance Cartridge Cover and the Main Board. 3. Replace the Maintenance Cartridge Cover with a new one. (P. 103) |
|
W-2404 |
Maintenance Cartridge Insufficient ink remaining amount error |
Insufficient free space in the Maintenance Cartridge. Delete all print jobs remaining in the operating system's print queue. Replace the Maintenance Cartridge, and then perform head cleaning or initial charge. |
There is not enough room available in the Maintenance Cartridge. |
Replace the Maintenance Cartridge with a new one. |
|
Error ID |
Name |
Message |
Cause (Status) |
Remedy |
|
W-5102 |
Communication error (Incorrect QName) (Windows only) |
Communication error The incorrect product may be selected. Delete all print jobs remaining in the operating system's print queue. Do one of the following. - The product is connected to “XXXX”. Print using this product. - Connect the product to the computer and turn the power on. If you turn the power off during printing, cancel the print job. |
• A printer not connected is selected in the printer driver settings. • The Printer and the PC cannot communicate. |
• Select an available printer correctly in the printer driver settings. • Connect the USB cable that connects the printer and the PC again. |
|
W-5103 |
Incorrect Device ID (Windows only) |
The different product is selected. Delete all print jobs remaining in the operating system's print queue. A product selected in the driver is different from a product to print. Check the driver settings and the product. |
No communication between the Printer and the PC. |
• Re-install the Printer Driver. • Select an available printer correctly in the printer driver settings. |
|
W-5104 |
Offline (Windows only) |
Not ready You cannot print offline. Connect the product to computer and turn the power on. Click [Online] to print when displayed, or click [Print Queue] and change to Online settings. |
Printer is offline. |
Connect the USB cable that connects the printer and the PC again. |
|
W-5105 |
Pause (Windows only) |
Paused You cannot print when it is in pause. Click [Resume] to print when displayed, or click [Print Queue] and deselect “Pause Printing” in the “Printer” menu. |
Printer is in the pause mode. |
If the resume printing message is displayed in the printer window, click it to resume printing. If not, click Print Queue and cancel the pause state manually. |
|
W-5202 |
Job size limit error (SDK) |
Amount of data in print jobs sent to printer is at maximum limit. Stop sending the current print job and send the remaining pages as another print job. |
The amount of data of the print jobs being sent to the printer has nearly reached the maximum limit. |
Delete all the print jobs once and send them in parts. |
|
Error ID |
Name |
Message |
Cause (Status) |
Remedy |
|
Error ID |
Name |
Message |
Cause (Status) |
Remedy |
|
E-2101 |
Tube maintenance error |
Parts have reached the end of their service life. • Ink Supply Tube Contact a technical representative. Delete all print jobs remaining in the operating system's print queue. |
The replacement time of Ink Tube is near. |
1. Replace the Ink Tube with a new one. (P. 116, P. 186, P. 179) 2. Reset the counter of the Ink Tube. (P. 219) |
|
E-2102 |
Decompression Pump maintenance error |
Parts have reached the end of their service life. • Ink Supply Decompression Pump Contact a technical representative. Delete all print jobs remaining in the operating system's print queue. |
The Decompression Pump Unit has reached its end of life. |
1. Replace the Decompression Pump Unit with a new one. (P. 181) 2. Reset the counter of the Decompression Pump Unit. (P. 219) |
|
E-2103 |
Passage Pump maintenance error |
Parts have reached the end of their service life. • Ink Supply Pump Contact a technical representative. Delete all print jobs remaining in the operating system's print queue. |
Ink Passage Pump Unit has reached its end of life. |
1. Replace the Ink Cartridge Holder with a new one. (P. 175, P. 179) 2. Reset the counter of the Ink Cartridge Holder. (P. 219) |
|
E-2104 |
Suction Pump maintenance error |
Parts have reached the end of their service life. • Ink Suction Pump Contact a technical representative. Delete all print jobs remaining in the operating system's print queue. |
Ink Suction Pump Unit has reached its end of life. |
1. Replace the Capping Unit with a new one. (P. 182) 2. Reset the counter of the Capping Unit. (P. 219) |
|
E-5101 |
Communication error (USB) |
The printer is disconnected. Delete all print jobs remaining in the operating system's print queue. Check that the cable is connected, and then turn the printer back on. Contact service support if the error continues to occur. |
• The printer and the PC cannot communicate. • The system error occurs. |
1. Connect the USB cable that connects printer and PC again. 2. Identify the error code referring to "Diagnosing failures based on the error code" (p47). 3. Perform the remedy corresponding to the identified error. |
|
E-9901 |
Fatal error |
A printer system error occurred. Delete all print jobs remaining in the operating system's print queue. Turn the printer off. Check if there is any paper remaining inside the printer, and then turn the printer back on. Contact service support if the error continues to occur. |
The system error occurs. |
1. Reboot the printer. 2. Identify the error code referring to "Diagnosing failures based on the error code" (p47). 3. Perform the remedy corresponding to the identified error. |
Troubleshooting by Error code
|
Code |
Error Name |
Cause |
Check Item |
Remedy |
|
0001 |
NMI occurred |
Board is damaged. |
--- |
Replace the Main Board with a new one. (P. 107) |
|
1000 |
LVS setting error |
PW Sensor cannot detect the threshold value for the paper presence. |
n Check if paper remains on the platen. n Check if the PW Sensor is broken. |
n Remove the paper. n Error reoccurs • Replace the CR Unit with a new one. (P. 124) • Replace the Main Board with a new one. (P. 107) |
|
1001 |
IF adjustment error |
IF adjustment for the PW Sensor cannot be performed. |
n Check if paper is fed normally. n Check if the PW Sensor is broken. |
n Eject the paper. n Error reoccurs • Replace the CR Unit with a new one. (P. 124) • Replace the Main Board with a new one. (P. 107) |
|
1002 |
Firmware update error |
n The firmware update file is broken. n The firmware update file is falsified. |
--- |
n Re-install the Printer Driver. n Re-install the Service Program. |
|
1003 |
CUT Speed lowered error |
The speed of the Cutter Unit drops lower than the threshold value. • Foreign objects exist in the path. • Deformation of the Cutter Unit. • Motor failure |
n Check if there is some foreign material on the roll. n Check if the Cutter Unit is not distorted. |
n Take away the foreign objects on the roll. n Error reoccurs • Replace the Cutter Unit with a new one. (P. 163) |
|
1004 |
5V controller FAN lock error |
Cooling Fan (+5V) is not rotating. |
1. Check the connection between the Cooling Fan (+5V) and Main Board (CN26). 2. Check if the Cooling Fan (+5V) is not distorted. |
1. Connect the Cooling Fan (+5V) again. 2. Replace the Cooling Fan (+5V) with a new one. (P. 187) |
|
1005 |
24V controller FAN lock error |
Cooling Fan (+24V) is not rotating. |
1. Check the connection between the Cooling Fan (+24V) and Main Board (CN24). 2. Check if the Cooling Fan (+24V) is not distorted. |
1. Connect the Cooling Fan (+24V) again. 2. Replace the Cooling Fan (+24V) with a new one. (P. 188) |
|
1102 |
Tube maintenance error |
The maintenance counter of the Ink Supply Tube exceeds the threshold value. (CR Unit drive path count exceeds the specified value (2.5 million passes).) |
--- |
1. Replace the Ink Tube with a new one. (P. 116, P. 186, P. 179) 2. Reset the counter of the Ink Tube. (P. 219) |
|
1125 |
CR HP detection error |
The CR Unit cannot track the Home position to set the CR origin. • False origin detection due to paper jam or the like • Misreading of CR Scale • CR Lock failure |
1. Check if the paper is jammed. 2. Check if the CR Scale is read out properly. • Check if the CR Scale is damaged or contaminated. 3. Check if the CR Lock functions normally. |
1. Re-install the CR Unit. (P. 124) 2. Clean the CR Scale with ethanol. 3. Replace the CR Scale with a new one. (P. 123) 4. Replace the Capping Unit with a new one. (P. 182) |
|
1126 |
CR lock set error CR lock set release error |
Capping Unit operation in abnormal. • Motor failure • Cable is damaged. • Board is damaged. • Capping Unit failure |
1. Check the connection between the Capping Unit and Main Board (CN203). 2. Unlock the CR Lock and check if the CR Lock functions normally. (P. 242) |
1. Replace the Capping Unit with a new one. (P. 182) 2. Replace the Main Board with a new one. (P. 107) |
|
1127 |
Overcurrent error |
The electric current flowing in the CR Unit exceeds the expected amount. • Irregular load due to paper jam. • Motor Lock • Motor driver failure • Encoder sensor failure |
Check if there are any foreign objects in the path of the CR Unit. |
n Remove the foreign objects in the path if any. n Error reoccurs • Replace the CR Motor with a new one. (P. 196) • Replace the Main Board with a new one. (P. 107) • Replace the CR Unit with a new one. (P. 124) |
|
1138 |
CR Motor over current error |
1. Connection failure of the CR Motor or the CR encoder sensor. 2. Detects accumulatively more than the specified number of times that the electric current which flows when driving the CR Motor is irregularly large. • Irregular load • Sensor failure |
1. Check the connection between the CR encoder sensor and Main Board (CN100). 2. Check the connection between the CR Motor and Main Board (CN200). |
1. Replace the CR Unit with a new one. (P. 124) 2. Replace the CR Motor with a new one. (P. 196) 3. Replace the Printer with a new one. |
|
1139 |
Oscillation error |
The direction of the electric current flowing in the CR Motor repeats reversing in the set frequency. • Motor driver failure • Encoder sensor failure • Motor failure |
n Check if there are any foreign objects (such as a clip) that may cause a short circuit around the motor driver on the Main Board. n Check if the CR encoder sensor is broken. |
n Remove the foreign objects on the board if any. n Error reoccurs • Replace the Main Board with a new one. (P. 107) • Replace the CR Unit with a new one. (P. 124) • Replace the CR Motor with a new one. (P. 196) |
|
113A |
CR Motor overload error |
The electric current flowing when driving the CR Motor is irregularly large. • FFC of the sensor was failure • CR Motor cable is damaged. • Irregular load • Encoder sensor failure • Motor failure |
1. Check if the CR Unit is installed correctly. 2. Check if there are any foreign objects on the drive section of the CR Unit. 3. Check the connection between the CR encoder sensor and Main Board (CN100). 4. Check the connection between the CR Motor and Main Board (CN200). 5. Carry out “Motor Measurement Adjustment” to check if the CR Motor functions normally. (P. 270) |
1. Reinstall the CR Unit. (P. 124) 2. Replace the CR Unit with a new one. (P. 124) 3. Replace the CR Motor with a new one. (P. 196) |
|
Code |
Error Name |
Cause |
Check Item |
Remedy |
|
113B |
CR Motor over speed error |
Detects that it is being driven at an irregularly faster speed than the specified value just before stopping. • Irregular load • Sensor failure • Motor driver failure |
--- |
1. Replace the CR Unit with a new one. (P. 124) 2. Replace the Main Board with a new one. (P. 107) |
|
113C |
CR Motor reversing error |
Detects accumulatively more than the specified number of times that it is being driven in the opposite direction to the specified driving direction. • The polarity of sensor FFC is opposite. • The polarity of CR Motor cable is opposite. • Slipping of the teeth of CR Timing Belt. • CR encoder sensor failure |
1. Check the connection between the CR encoder sensor and Main Board (CN100). 2. Check the connection between the CR Motor and Main Board (CN200). 3. Check if the tension of the CR Timing Belt is proper. (P. 259) |
1. Adjust the tension of the CR Timing Belt. (P. 259) 2. Replace the CR Unit with a new one. (P. 124) |
|
113D |
CR Motor driving timeout error |
Detects that the driving period is irregularly long. • Irregular load • The firmware has a defect. |
--- |
Replace the Main Board with a new one. (P. 107) |
|
113E |
CR Motor velocity deviation error |
Detects accumulatively more than the specified number of times that it is being driven in the opposite direction to the specified driving direction. • Irregular load • CR encoder sensor failure • CR Motor failure • CR Motor driver failure |
1. Carry out “Motor Measurement Adjustment” to check if the CR Motor functions normally. (P. 270) |
1. Replace the CR Unit with a new one. (P. 124) 2. Replace the CR Motor with a new one. (P. 196) 3. Replace the Main Board with a new one. (P. 107) |
|
113F |
CR Motor lock error |
Detects that it is being driven at an irregularly slower speed than the specified value. • FFC of the CR encoder sensor is damaged. • CR Motor cable is damaged. • Irregular load • CR encoder sensor failure • CR Motor failure |
1. Check the connection between the CR encoder sensor and Main Board (CN100). 2. Check the connection between the CR Motor and Main Board (CN200). 3. Carry out “Motor Measurement Adjustment” to check if the CR Motor functions normally. (P. 270) |
1. Replace the CR Unit with a new one. (P. 124) 2. Replace the CR Motor with a new one. (P. 196) |
|
1229 |
Oscillation error |
The direction of the electric current flowing in the PF Motor repeats reversing in the set frequency. • Motor driver failure • Encoder sensor failure • Motor failure |
n Check if there are any foreign objects (such as a clip) that may cause a short circuit around the motor driver on the Main Board. n Check if the PF encoder sensor is broken. |
n Remove the foreign objects on the board if any. n Error reoccurs • Replace the Main Board with a new one. (P. 107) • Replace the PF Encoder Sensor with a new one. (P. 165) • Replace the PF Motor with a new one. (P. 195) |
|
Code |
Error Name |
Cause |
Check Item |
Remedy |
|
122A |
PF Motor overload error |
The electric current flowing when driving the motor is irregularly large. • FFC of the PF Encoder Sensor is damaged. • PF Motor cable is damaged. • Irregular load • PF Encoder Sensor failure • PF Motor failure |
1. Check the connection between the PF Encoder Sensor and Main Board (CN110). 2. Check the connection between the PF Motor and Main Board (CN204). 3. Carry out “Motor Measurement Adjustment” to check if the PF Motor functions normally. (P. 270) |
1. Replace the PF Encoder Sensor with a new one. (P. 165) 2. Replace the PF Motor with a new one. (P. 195) 3. Replace the Printer with a new one. |
|
122B |
PF Motor over speed error |
Detects that it is being driven at an irregularly faster speed than the specified value just before stopping. • Irregular load • PF Encoder Sensor failure • Motor driver failure |
--- |
1. Replace the PF Encoder Sensor with a new one. (P. 165) 2. Replace the Main Board with a new one. (P. 107) |
|
122C |
PF Motor reversing error |
Detects accumulatively more than the specified number of times that it is being driven in the opposite direction to the specified driving direction. • The polarity of PF Encoder Sensor FFC is opposite. • The polarity of PF Motor cable is opposite. • Slipping of the teeth of PF Timing Belt. • PF Encoder Sensor failure |
1. Check the connection between the PF Encoder Sensor and Main Board (CN110). 2. Check the connection between the PF Motor and Main Board (CN204). 3. Check if the tension of the PF Timing Belt is proper. (P. 267) |
1. Adjust the tension of the PF Timing Belt. (P. 267) 2. Replace the PF Encoder Sensor with a new one. (P. 165) |
|
122D |
PF Motor driving time-out error |
Detects that the driving period is irregularly long. • Irregular load • The firmware has a defect. |
--- |
Replace the Main Board with a new one. (P. 107) |
|
122E |
PF Motor velocity deviation error |
Detects, when accelerating/decelerating the motor, that it is being driven at an irregularly faster speed than the specified value. • Irregular load • PF Encoder Sensor failure • Motor failure • Motor driver failure |
1. Carry out “Motor Measurement Adjustment” to check if the PF Motor functions normally. (P. 270) |
1. Replace the PF Encoder Sensor with a new one. (P. 165) 2. Replace the PF Motor with a new one. (P. 195) 3. Replace the Main Board with a new one. (P. 107) |
|
122F |
PF Motor lock error |
1. The PF Motor or the PF Encoder Sensor is not connected correctly. 2. Detects that it is being driven at an irregularly slower speed than the specified value. • Irregular load • PF Encoder Sensor failure • Motor failure |
1. Check the connection between the PF Encoder Sensor and Main Board (CN110). 2. Check the connection between the PF Motor and Main Board (CN204). 3. Carry out “Motor Measurement Adjustment” to check if the PF Motor functions normally. (P. 270) |
1. Replace the PF Encoder Sensor with a new one. (P. 165) 2. Replace the PF Motor with a new one. (P. 195) |
|
131B |
Head driver (transmission gate) overheat error |
The temperature of the Head driver rises, and reaches the specified level. |
1. Turn the power off and then on again to check if the printer recovers from the error. 2. Check the connection of the Head FFC. • Any slant connection or a similar abnormality? |
1. Replace the Head FFC with a new one. (P. 122) 2. Replace the Print Head with a new one. (P. 120) |
|
Code |
Error Name |
Cause |
Check Item |
Remedy |
|
1412 |
IS Motor life error |
The number of pump operation counter of the Capping Unit reached the specified upper limit. |
--- |
1. Replace the Capping Unit with a new one. (P. 182) 2. Reset the counter of the Capping Unit. (P. 219) |
|
1432 |
Passage Pump maintenance error |
Operations of the diaphragm in the Ink Cartridge Holder exceeded the specified value. |
--- |
1. Replace the Ink Cartridge Holder with a new one. (P. 175, P. 179) 2. Reset the counter of the Ink Cartridge Holder. (P. 219) |
|
143D |
Driving time-out error |
Detects that the driving period of the Capping Unit is irregularly long. • Irregular load • The firmware has a defect. |
n Check if any foreign objects are stuck in the capping motor. n Check if something is caught at the motor. |
n Error reoccurs • Replace the Main Board with a new one. (P. 107) • Replace the Capping Unit with a new one. (P. 182) |
|
1495 |
Ink leak error |
Detects the ink leak in the IES (Ink End Sensor). |
n Check the ink leak around the Ink Cartridge Holder and the bottom of that. |
n Refer to the troubleshooting. (P. 75) |
|
150C |
PG origin detection error |
1. Connection failure of the APG position sensor. 2. When PG is being adjusted, the APG position sensor cannot detect its origin. • APG position sensor failure • APG Motor failure 3. UR Unit is not moved to the PG adjustment position. • FFC connection failure |
1. Check the connection between the APG position sensor and Main Board (CN118). 2. Check the attachment status of Head FFC, tubes, and clamps. (P. 122) |
Replace the APG Unit with a new one. (P. 128) |
|
1525 |
Roll motor slacking error |
Slack Sensor cannot detect a slack when slacking the roll paper during PF cooperative normal rotation. • Slack Sensor Unit failure • Sensor failure • Sensor cable is damaged. • Main Board failure |
1. Check the connection between the Slack Sensor and Main Board (CN202). 2. Carry out “Sensor Check” to check if the Slack sensor functions normally. (P. 224) |
1. Replace the Slack Sensor Unit with a new one. (P. 167) 2. Replace the Main Board with a new one. (P. 107) |
|
1529 |
Oscillation error |
The direction of the electric current flowing in the Roll Motor repeats reversing in the set frequency. • Motor driver failure • Encoder failure • Motor failure |
n Check if there are any foreign objects (such as a clip) that cause a short circuit around the motor driver on the board. n Check if the Roll motor Encoder is broken. |
n Remove the foreign objects on the board if any. n Error reoccurs • Replace the Main Board with a new one. (P. 107) • Replace the Roll motor with a new one. (P. 198) |
|
Code |
Error Name |
Cause |
Check Item |
Remedy |
|
152A |
Roll motor overload error |
The electric current flowing when driving the motor is irregularly large. • Motor cable failure • Irregular load • Encoder failure • Motor failure |
1. Check the connection between the Roll motor and Main Board (CN116, CN206). |
n Take away the foreign objects. n Error reoccurs • Replace the Main Board with a new one. (P. 107) • Replace the Roll motor with a new one. (P. 198) |
|
152B |
Roll motor over speed error |
Detects that it is being driven at an irregularly faster speed than the specified value just before stopping. • Irregular load • Encoder failure • Motor driver failure |
--- |
n Take away the foreign objects. n Error reoccurs • Replace the Main Board with a new one. (P. 107) • Replace the Roll motor with a new one. (P. 198) |
|
152C |
Roll motor reversing error |
Detects accumulatively more than the specified number of times that it is being driven in the opposite direction to the specified driving direction. • The polarity of Roll motor cable is opposite. • Encoder failure |
1. Check the connection between the Roll motor and Main Board (CN116, CN206). |
n Take away the foreign objects. n Error reoccurs • Replace the Main Board with a new one. (P. 107) • Replace the Roll motor with a new one. (P. 198) |
|
152D |
Roll motor driving time-out error |
Detects that the driving period is irregularly long. • Irregular load • The firmware has a defect. |
--- |
n Take away the foreign objects. n Error reoccurs • Replace the Main Board with a new one. (P. 107) • Replace the Roll motor with a new one. (P. 198) |
|
152E |
Roll motor velocity deviation error |
Detects, when accelerating/decelerating the motor, that it is being driven at an irregularly faster speed than the specified value. • Irregular load • Encoder failure • Motor failure • Motor driver failure |
--- |
n Take away the foreign objects. n Error reoccurs • Replace the Main Board with a new one. (P. 107) • Replace the Roll motor with a new one. (P. 198) |
|
152F |
Roll motor lock error |
1. Connection failure of the Roll motor. 2. Detects that it is being driven at an irregularly slower speed than the specified value. • Irregular load • Encoder failure • Motor failure |
1. Check the connection between the Roll motor and Main Board (CN116, CN206). |
n Take away the foreign objects. n Error reoccurs • Replace the Main Board with a new one. (P. 107) • Replace the Roll motor with a new one. (P. 198) |
|
Code |
Error Name |
Cause |
Check Item |
Remedy |
|
1540 |
The home position of the cutter is not detected. |
The home position of the cutter home sensor is not detected. • Operation failure due to paper jam. • Sensor failure • Motor failure |
1. Check if the paper is jammed around the Cutter Unit. 2. Check the connection between the Cutter Unit and Main Board (CN117, CN207). 3. Carry out “Sensor Check” to check if the cutter home sensor functions normally. (P. 224) |
n Take away the foreign objects. n Error reoccurs • Replace the Main Board with a new one. (P. 107) • Replace the Cutter Unit with a new one. (P. 163) |
|
1541 |
Cutter return error |
The Cutter cannot return to its home position. • Slipping of the teeth of the Cutter Timing Belt. • Sensor failure |
1. Check if the tension of the Cutter Timing Belt is proper. 2. Carry out “Sensor Check” to check if the cutter home sensor functions normally. (P. 224) |
n Take away the foreign objects. n Error reoccurs • Replace the Main Board with a new one. (P. 107) • Replace the Cutter Unit with a new one. (P. 163) |
|
1542 |
Oscillation error |
The direction of the electric current flowing in the Cutter motor repeats reversing in the set frequency. • Motor driver failure • Encoder failure • Motor failure |
n Check if there are any foreign objects (such as a clip) that may cause a short circuit around the motor driver on the Main Board. n Check if the Cutter motor / encoder is in a normal state. |
n Take away the foreign objects. n Error reoccurs • Replace the Main Board with a new one. (P. 107) • Replace the Cutter Unit with a new one. (P. 163) |
|
1549 |
Cutter motor disconnection error |
The direction of the electric current flowing in the Cutter motor repeats reversing in the set frequency. • Motor driver failure • Encoder failure • Motor failure |
1. Check the connection between the Cutter Unit and Main Board (CN117, CN207). |
n Take away the foreign objects. n Error reoccurs • Replace the Main Board with a new one. (P. 107) • Replace the Cutter Unit with a new one. (P. 163) |
|
154A |
Cutter motor overload error |
The direction of the electric current flowing in the Cutter motor repeats reversing in the set frequency. • Motor driver failure • Encoder failure • Motor failure |
1. Check the connection between the cutter home sensor and Main Board (CN117). 2. Check if there is an abnormal load on the Cutter Unit. 3. Check the connection between the Cutter motor and Main Board (CN207). 4. Carry out “Sensor Check” to check if the cutter home sensor functions normally. (P. 224) |
n Take away the foreign objects. n Error reoccurs • Replace the Main Board with a new one. (P. 107) • Replace the Cutter Unit with a new one. (P. 163) |
|
154B |
Cutter motor over speed error |
The direction of the electric current flowing in the Cutter motor repeats reversing in the set frequency. • Motor driver failure • Encoder failure • Motor failure |
1. Check if the tension of the Cutter Timing Belt is proper. |
n Take away the foreign objects. n Error reoccurs • Replace the Main Board with a new one. (P. 107) • Replace the Cutter Unit with a new one. (P. 163) |
|
Code |
Error Name |
Cause |
Check Item |
Remedy |
|
154C |
Cutter motor reversing error |
The direction of the electric current flowing in the Cutter motor repeats reversing in the set frequency. • Motor driver failure • Encoder failure • Motor failure |
1. Check the connection between the cutter motor and Main Board (CN207). |
n Take away the foreign objects. n Error reoccurs • Replace the Main Board with a new one. (P. 107) • Replace the Cutter Unit with a new one. (P. 163) |
|
154D |
Cutter motor driving time-out error |
The direction of the electric current flowing in the Cutter motor repeats reversing in the set frequency. • Motor driver failure • Encoder failure • Motor failure |
--- |
n Take away the foreign objects. n Error reoccurs • Replace the Main Board with a new one. (P. 107) • Replace the Cutter Unit with a new one. (P. 163) |
|
154E |
Cutter motor velocity deviation error |
The direction of the electric current flowing in the Cutter motor repeats reversing in the set frequency. • Motor driver failure • Encoder failure • Motor failure |
1. Check if the tension of the Cutter Timing Belt is proper. |
n Take away the foreign objects. n Error reoccurs • Replace the Main Board with a new one. (P. 107) • Replace the Cutter Unit with a new one. (P. 163) |
|
154F |
Cutter motor lock error |
The direction of the electric current flowing in the Cutter motor repeats reversing in the set frequency. • Motor driver failure • Encoder failure • Motor failure |
1. Check the connection between the cutter motor and Main Board (CN207). |
n Take away the foreign objects. n Error reoccurs • Replace the Main Board with a new one. (P. 107) • Replace the Cutter Unit with a new one. (P. 163) |
|
1552 |
Decompression pump maintenance error |
The direction of the electric current flowing in the Decompression pump motor repeats reversing in the set frequency. • Motor driver failure • Encoder failure • Motor failure |
--- |
n Take away the foreign objects. n Error reoccurs • Replace the Main Board with a new one. (P. 107) • Replace the Decompression Pump Unit with a new one. (P. 181) |
|
1559 |
Oscillation error |
The direction of the electric current flowing in the Decompression pump motor repeats reversing in the set frequency. • Motor driver failure • Encoder failure • Motor failure |
n Check if there are any foreign objects (such as a clip) that may cause a short circuit around the motor driver on the board. n Check if the Decompression pump motor/encoder is in a normal state. |
n Take away the foreign objects. n Error reoccurs • Replace the Main Board with a new one. (P. 107) • Replace the Decompression Pump Unit with a new one. (P. 181) |
|
Code |
Error Name |
Cause |
Check Item |
Remedy |
|
155A |
Decompression pump motor overload error |
The electric current flowing when driving the motor is irregularly large. • Decompression Pump Unit cable is damaged. • Irregular load • Decompression Pump Unit encoder failure • Decompression Pump Unit failure |
1. Check the connection between the Decompression Pump Unit and Main Board (CN115, CN202). |
Replace the Decompression Pump Unit with a new one. (P. 181) |
|
155B |
Decompression pump motor over speed error |
Detects that it is being driven at an irregularly faster speed than the specified value just before stopping. • Irregular load • Encoder failure • Motor driver failure |
--- |
1. Replace the Decompression Pump Unit with a new one. (P. 181) 2. Replace the Main Board with a new one. (P. 107) |
|
155C |
Decompression pump motor reversing error |
Detects accumulatively more than the specified number of times that it is being driven in the opposite direction to the specified driving direction. • The polarity of Decompression pump motor cable is opposite. • Encoder failure |
1. Check the connection between the Decompression Pump Unit and Main Board (CN115, CN202). |
Replace the Decompression Pump Unit with a new one. (P. 181) |
|
155D |
Decompression pump motor driving time-out error |
Detects that the driving period is irregularly long. • Irregular load • The firmware has a defect. |
--- |
Replace the Main Board with a new one. (P. 107) |
|
155E |
Decompression pump motor velocity deviation error |
Detects, when accelerating/decelerating the motor, that it is being driven at an irregularly faster speed than the specified value. • Irregular load • Encoder failure • Motor failure • Motor driver failure |
--- |
1. Replace the Decompression Pump Unit with a new one. (P. 181) 2. Replace the Main Board with a new one. (P. 107) |
|
155F |
Decompression pump motor lock error |
1. Connection failure of the Decompression pump motor. 2. Detects that it is being driven at an irregularly slower speed than the specified value. • Irregular load • Encoder failure • Motor failure |
1. Check the connection between the Decompression Pump Unit and Main Board (CN115, CN202). |
Replace the Decompression Pump Unit with a new one. (P. 181) |
|
1801 |
AID communication error |
An error occurs during AID communication check. • Connection failure of the AID Board. • AID Board failure |
1. Turn the power off and then on again to check if the printer recovers from the error. 2. Check the connection between the AID Unit (CN1) and Main Board (CN101). 3. Carry out “AID Inspection” to check if the AID Unit functions normally. (P. 224) |
Replace the AID Unit with a new one. (P. 113) |
|
Code |
Error Name |
Cause |
Check Item |
Remedy |
|
1930 |
Heater thermistor open error |
The heater thermistor becomes open. • Connection failure • Defective parts |
1. Check the connection between the Heater thermistor and Heater Board (CN3). 2. Check if the Heater thermistor is broken. |
1. Replace the Heater Unit with a new one. (P. 192) |
|
1931 |
Heater thermistor short error |
The heater thermistor becomes short-circuited. • Connection failure • Defective parts |
1. Check the connection between the Heater thermistor and Heater Board (CN3). 2. Check if the Heater thermistor is broken. |
1. Replace the Heater Unit with a new one. (P. 192) |
|
1932 |
Heater abnormal high temperature error |
The Heater ON/OFF circuit is abnormal. |
Turn the power off once and turn it back on to check if the printer recovers from the error. (Ignore it if the error does not occur again). |
Replace the Heater Board with a new one. (P. 109) |
|
1933 |
Heater abnormal low temperature error |
The temperature of the Heater Unit decreases abnormally during operation. • Thermistor installation failure • Harness failure • Thermostat has worked (breaking). • Heater Unit failure • Board failure (including blowout of the fuse) |
1. Turn the power off once and turn it back on to check if the printer recovers from the error. (Ignore it if the error does not occur again) 2. Check the connection between the Heater Unit and Heater Board (CN2, CN3, CN4, CN7). 3. Check if the fuse is blown out. |
1. Replace the Heater Unit with a new one. (P. 192) 2. Replace the fuse of Heater Board with a new one. (P. 301) 3. Replace the Heater Board with a new one. (P. 109) |
|
1934 |
Heater warming up low temperature error |
The Heater Unit cannot be warmed up within the specified time. • Thermistor installation failure • Heater Unit failure • Breaking or disconnection of the harness • Thermostat has worked (breaking). • Board failure |
1. Turn the power off once and turn it back on to check if the printer recovers from the error. (Ignore it if the error does not occur again) 2. Check the connection between the Heater Unit and Heater Board (CN2, CN3, CN4, CN7). 3. Check if the fuse is blown out. |
1. Replace the Heater Unit with a new one. (P. 192) 2. Replace the fuse of Heater Board with a new one. (P. 301) 3. Replace the Heater Board with a new one. (P. 109) |
|
1935 |
Heater AC error |
Cannot make AC detection of the Heater Unit. • Heater Unit failure • Breaking or disconnection of the harness • Board failure |
1. Turn the power off once and turn it back on to check if the printer recovers from the error. (Ignore it if the error does not occur again) 2. Check the connection between the Heater Unit and Heater Board (CN2, CN3, CN4, CN7). 3. Check if the fuse is blown out. |
1. Replace the Heater Unit with a new one. (P. 192) 2. Replace the fuse of Heater Board with a new one. (P. 301) 3. Replace the Heater Board with a new one. (P. 109) |
|
1936 |
Heater UART communication time out error |
No reply in the UART communication, no UART communication for a certain period. • Harness failure • Board failure |
1. Turn the power off once and turn it back on to check if the printer recovers from the error. (Ignore it if the error does not occur again) 2. Check the connection between the Heater Board (CN8) and Heater Board (CN8). |
1. Replace the harness with a new one. 2. Replace the Heater Board with a new one. (P. 109) 3. Replace the Main Board with a new one. (P. 107) |
|
1937 |
UART communication error |
UART communication is failed. • Harness failure • Board failure |
1. Turn the power off once and turn it back on to check if the printer recovers from the error. (Ignore it if the error does not occur again) 2. Check the connection between the Heater Board (CN8) and Heater Board (CN8). |
1. Replace the harness with a new one. 2. Replace the Heater Board with a new one. (P. 109) 3. Replace the Main Board with a new one. (P. 107) |
|
Code |
Error Name |
Cause |
Check Item |
Remedy |
|
1939 |
Anti-condensation fan lock error (Home) |
The Anti-condensation fan (Home side) does not rotate. (due to connection failure or defective parts) |
1. Check the connection between the Anti-condensation fan (Home) and Heater Board (CN4). 2. Check if the Anti-condensation fan (Home side) is broken. |
1. Connect the cable again. 2. Replace the Heater Unit with a new one. (P. 192) |
|
1940 |
Anti-condensation fan lock error (Full) |
The Anti-condensation fan (Full side) does not rotate. (due to connection failure or defective parts) |
1. Check the connection between the Anti-condensation fan (Full) and Heater Board (CN7). 2. Check if the Anti-condensation fan (Full side) is broken. |
1. Connect the cable again. 2. Replace the Heater Unit with a new one. (P. 192) |
|
1A37 |
Thermistor error |
1. The Head FFC is not connected correctly. 2. The thermistor detects a temperature out of the specification. 3. Head thermistor failure |
Check the connecting part of Head FFC if there is any loose or slant connection, or ripped terminals or the breaking of the FFC. |
1. Replace the Head FFC with a new one. (P. 122) 2. Replace the Print Head with a new one. (P. 120) |
|
1A38 |
Transistor temperature error |
1. Transistor failure 2. The thermistor detects a temperature out of the specification. |
--- |
Replace the Print Head with a new one. (P. 120) |
|
1A39 |
Head error |
1. Connection failure of the Head FFC. 2. The head is damaged due to a slant connection FFC or the like. • The drive circuit in the Print Head is damaged. • The fuse of the Main Board has blown. |
Check the connecting part of Head FFC if there is any loose or slant connection, or ripped terminals or the breaking of the FFC. |
1. Replace the Head FFC with a new one. (P. 122) 2. Replace the Print Head with a new one. (P. 120) 3. If the printer does not recover from the error after trying 1 and 2, replace the Main Board. (P. 107) |
|
1A41 |
Head rank ID input error |
The information of the Head rank ID is wrong. |
Carry out “Head ID Check & Input” to check the current ID. (P. 230) |
Configure the Head rank ID again. |
|
1A50 |
I2C communication error (Between elements on ASIC and MAIN) |
The I2C communication error has occurred in the Main Board. |
--- |
Replace the Main Board with a new one. (P. 107) |
|
1F80 |
VHV fuse blowout error (42V system) |
IES (Ink End Sensor) control error has occurred. • The fuse of the Main Board has blown. |
n Check the connection between the Left Ink Cartridge Holder and the Main Board if there is any loose or slant connection, or ripped terminals or the breaking of the FFC (CN401). n Check the connection between the Right Ink Cartridge Holder and the Main Board if there is any loose or slant connection, or ripped terminals or the breaking of the FFC (CN400). |
Replace following parts at the same time. n Replace the FFC (CN400, CN401) between the Main Board and CRCM Board. n Replace the Ink Cartridge Holder with a new one. (P. 175, P. 179) n Replace the Main Board with a new one. (P. 107) |
|
1F83 |
ASIC COO error |
CRCM Board control error has occurred. • Failure of the FFC which connects the Main Board and CRCM board • CRCM Board failure |
Check if the FFC is connected at a slant. |
1. Replace the FFC (CN400, CN401) between the Main Board and CRCM Board. 2. Replace the Ink Cartridge Holder with a new one. (P. 175, P. 179) 3. Replace the Main Board with a new one. (P. 107) |
|
Code |
Error Name |
Cause |
Check Item |
Remedy |
|
1F84 |
Data writing error 1 |
Temporary error of the firmware or the Main Board. However, it may occur due to unexpected reasons such as external noises. |
Turn the power off once and turn it back on to check if the printer recovers from the error. (Ignore it if the error does not occur again) |
1. Re-install the firmware. 2. Replace the Main Board with a new one. (P. 107) |
|
1F85 |
Data writing error 2 |
Temporary error of the firmware or the Main Board. However, it may occur due to unexpected reasons such as external noises. |
Turn the power off once and turn it back on to check if the printer recovers from the error. (Ignore it if the error does not occur again) |
1. Re-install the firmware. 2. Replace the Main Board with a new one. (P. 107) |
|
1FB8 |
ASIC access error |
IES (Ink End Sensor) control error has occurred. • CRCM Board failure • Main Board failure |
--- |
1. Replace the Ink Cartridge Holder. (Check both right/left ones respectively) (P. 175, P. 179) 2. Replace the Main Board with a new one. (P. 107) |
|
1FB9 |
CSIC error (1) |
Communication failure between the Cartridge Holder and Main Board. • Connection failure of the FFC. • CRCM Board failure • Main Board failure |
n Check the connection between the Left Ink Cartridge Holder and the Main Board if there is any loose or slant connection, or ripped terminals or the breaking of the FFC (CN401). n Check the connection between the Right Ink Cartridge Holder and the Main Board if there is any loose or slant connection, or ripped terminals or the breaking of the FFC (CN400). |
1. Replace the FFC (CN400, CN401) between the Cartridge Holder and Main Board. (Check both right/left ones respectively.) 2. Replace the Ink Cartridge Holder. (Check both right/left ones respectively) (P. 175, P. 179) 3. Replace the Main Board with a new one. (P. 107) |
|
1FBA |
CSIC error (2) |
|||
|
1FBE |
CSIC error (3) |
|||
|
1FBF |
CSIC error (4) |
|||
|
1FC0 |
CSIC error (5) |
|||
|
1FC1 |
CSIC error (6) |
|||
|
1FC4 |
IES error (1) |
IES control error has occurred. • CRCM Board failure • Main Board failure |
--- |
1. Replace the Ink Cartridge Holder with a new one. (Check both right/left ones respectively) (P. 175, P. 179) 2. Replace the Main Board with a new one. (P. 107) |
|
1FC5 |
IES error (2) |
|||
|
1FC6 |
IES error (3) |
|||
|
1FC7 |
IES error (4) |
|||
|
1FC8 |
IES error (5) |
|||
|
1FC9 |
IES error (6) |
|||
|
2000 |
NVRAM error |
NVRAM erase or write error has occurred. |
--- |
Replace the Main Board with a new one. (P. 107) |
|
2002 |
SDRAM error |
Any value cannot be input when accessing SDRAM to write the value. |
--- |
Replace the Main Board with a new one. (P. 107) |
|
2003 |
FLASH BOOT SUM CHECK error |
1. Installation of the firmware has been failed. 2. The Flash ROM is damaged. |
--- |
1. Re-install the firmware. 2. Replace the Main Board with a new one. (P. 107) |
|
200A |
F/W load error |
Reading/decompressing the firmware has been failed. |
--- |
1. Re-install the firmware. 2. Replace the Main Board with a new one. (P. 107) |
|
Code |
Error Name |
Cause |
Check Item |
Remedy |
|
200D |
System interrupt watchdog time-out error |
A system failure such as CPU failure, defective cash or the like has occurred. |
--- |
Replace the Main Board with a new one. (P. 107) |
|
3000 |
AC shut-off |
The AC power has been shut off due to a power failure, unplugged, Power Supply Board failure, or Main Board failure or the like. |
Check if the Power cable is correctly connected. |
1. Replace the Power Supply Board with a new one. (P. 111) 2. Replace the Main Board with a new one. (P. 107) |
|
Dxxy |
Service call for FW debugging |
This is an error for debugging in the design stage. However, it may occur due to unexpected reasons such as external noises. |
Turn the power off once and turn it back on to check if the printer recovers from the error. (Ignore it if the error does not occur again). |
1. Re-install the firmware. 2. Replace the Main Board with a new one. (P. 107) |
|
Fxxx |
CPU related error |
n The firmware has a defect. n The Main Board is broken. |
Check if the installed firmware supports this printer. |
1. Re-install the firmware. 2. Replace the Main Board with a new one. (P. 107) |
|
Code |
Error Name |
Cause |
Check Item |
Remedy |