
iPhone 11, 11PRO, 11PRO MAX Schematic Diagram
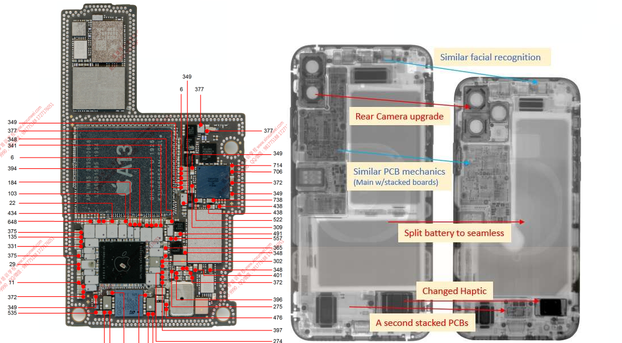
iPhone 11, 11PRO, 11 PRO MAX Service Manual, PCB Layout, Resistance on connectors, arrangement of elements, boardview, circuit diagram
All Schemes were found in open sources and are shown here for informational purposes only. If you are the copyright holder, please Contact Us
| Title | Download Link |
| iPhone 11 Resistance table of connecting base | Download |
| iPhone 11 Important supply resistance value-AP | Download |
| iPhone 11 Important supply resistance value-BB | Download |
| Title | Download Link |
| IPhone 11pro SIM card circuit diagram | Download |
| IPhone 11pro Sensitive distance volume circuit | Download |
| IPhone 11pro RF power supply circuit diagram | Download |
| IPhone 11pro Receiver power amplifier circuit | Download |
| IPhone 11pro Power on circuit diagram | Download |
| IPhone 11pro Power amplifier supply circuit | Download |
| IPhone 11pro Microphone circuit diagram | Download |
| IPhone 11pro Low frequency power amplifier circuit | Download |
| IPhone 11pro Low frequency diversity receiving circuit | Download |
| IPhone 11pro High frequency diversity receiving circuit | Download |
| IPhone 11pro Hard disk circuit diagram | Download |
| IPhone 11pro High frequency power amplifier circuit | Download |
| IPhone 11pro I2C bus circuit | Download |
| IPhone 11pro Wide angle camera circuit | Download |
| IPhone 11pro USB circuit | Download |
| IPhone 11pro Gyroscope circuit | Download |
| IPhone 11pro Front camera circuit | Download |
| IPhone 11pro Flash circuit | Download |
| IPhone 11pro Face recognition circuit | Download |
| iPhone 11Pro-BB circuit diagram | Download |
| iPhone 11Pro-AP+BB circuit diagram | Download |
| iPhone 11Pro-AP Partial Point Bitmap | Download |
| iPhone 11pro boot short contact | Download |
| IPhone 11pro Baseband logic chip circuit | Download |
| IPhone 11pro display circuit | Download |
| IPhone 11pro Circuit design of telephoto camera | Download |
| iPhone 11 pro pcb layout | Download |
| Title | Download Link |
| iPhone 11ProMAX-AP Partial Point Bitmap | Download |
| iPhone 11ProMAX-AP+BB Partial bitmap | Download |
| iPhone 11ProMAX-AP+BB | Download |
| iPhone 11ProMAX-BB Partial bitmap | Download |
| iPhone 11ProMax Component distribution diagram | Download |
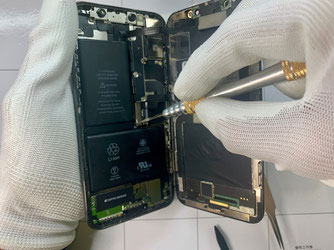
IPhone 11 display replacement
Unscrew two screws - they are located on the bottom end of the phone. This can be done with a special Pentalobe screwdriver.
Let's move on to peeling off the back cover. Use a guitar pick or a plastic spatula to pry it under the cover to pry it away from the body. For better and faster peeling, it is better to warm it up with a hairdryer and then peel it off using a suction cup.
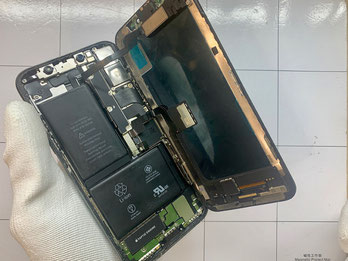
When the cover is already separated from the body, unscrew all the screws using a special screwdriver. We disconnect the motherboard, battery cables, batteries, charging and headphone jacks, and camera. You need to be careful and remember what was unscrewed and peeled off and in what order, so that later it will be easier to assemble the phone. After this, you will already have some experience on how to change a broken display on an iPhone 11.

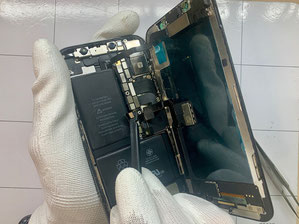
For the next stage, only the frame with the glued display module should remain in your hands. The battery must also be first disconnected from the case - we disconnect its cable and other cables using tweezers.
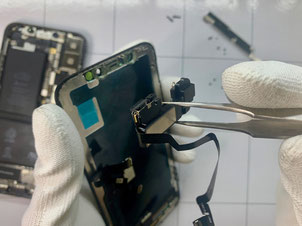
Now you need to be very careful - it is important to correctly peel the module from the frame and glue a new one. We rearrange all the sensors, volume buttons and camera into the new screen module, adhering to the sequence and performing very careful actions.

Replacing the screen yourself, without the help of service centers, can save a lot of money. But you will have to spend a lot of time before replacing the display with a touchscreen is successful.
iPhone 11 assembly
We assemble the phone in strict reverse order - check whether the screws are tightened correctly, connectors, buttons are installed, and cables are connected. Ultimately, the phone should work and the display should turn on - if assembled correctly, there will be no hint that the glass of this gadget broke not so long ago.
riad khalil (Wednesday, 28 May 2025 11:12)
Hi
Borodinski (Monday, 30 September 2024 23:44)
That's certainly not an iPhone 11 on your first links.
andes (Wednesday, 18 September 2024 11:25)
cant you help me , plis give your apple 11 pro max bit map
Dgf (Saturday, 25 May 2024 22:42)
Hallo